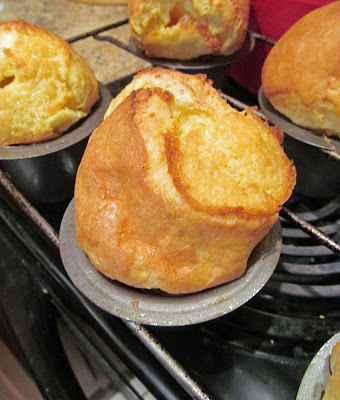
Until then Pop-Buns - otherwise known as Popovers.
Popovers are a favorite of mine, though I don't make them very often, their being just an occasional treat.
But they are worth it. They are tall, flaky on the outside and all soft and billowy inside, partially hollow, where the steam makes them rise. Pull them apart and add a dab of butter or honey. . oh my. With more eggs than most recipes call for, these are exceptionally rich and custardy inside, they hardly even need butter. If you've not tried popovers, or did and they turned out short and hard, try this recipe and my hints (that resulted from popover - FAIL!)
Once you've ripped into one of these, the vanilla infused steam rising from the eggy, nearly naked interior, you'll have a hard time not making them again.
Popovers (click for the recipe)
click on photo to enlarge
The HOTR hints to a successful popover (or how to avoid any loved one saying "that's OK, we have Grape Nuts).
(1) Use a tulip-shaped popover pan because it allows the hot air in the oven to circulate entirely around each popover, and the lipped rim helps the popover batter form a large crust dome. Cooking stores carry them, or online, but you won't find them at a big box mart type store. Yes, some folks say a muffin tin will work, but you want a big nuclear cloud of popover, not a mushroom.
(2) Use milk and eggs that have been left at room temperature for at least 30 minutes
(3) Use a wire whisk to whisk wet ingredients and then mix the dry into the wet (do NOT try the "easy blender" method unless you normally snack on golf balls).
(4) After the batter is mixed, let it rest for 15 minutes, then give it a quick whisk or two before pouring into tins.
(5) Preheat the popover pan in the oven for at least two minutes, then add a bit of melted butter to each tin, using a brush to quickly butter the sides AND the rim (for more rising). There should still be a little bit of melted butter in the bottom of the tin. If you don't have a brush, swirl it around in the pan, then use some non stick spray on the tops and rim.
(6) Use FRESH flour. If the flour has been sitting out in a canister a year or so, you will likely end up with small pucks, fresh flour makes a HUGE difference in the rise.
(7) Do NOT open the door during the cooking time and instruct your curious friends to do the same. Warn them that you have a whisk, and are not afraid to use it. Use the oven light to check on them, but do NOT open the door.(8) Respect the cooking time. Popover tops will brown up nicely well before the insides have cooked. Setting the rack in the bottom 1/3 of the oven is essential, giving them plenty of room to rise, but not so close they start to burn from the upper element. But unless the tops are burning, use the cooking time in the recipe.
(9) When they come out of the oven, put a tiny hole in the top with a steak knife tip to let some of the steam out so they don't start getting soggy as you prepare the plate, butter, etc.
If you think you will have leftovers (ha!), immediately poke a bigger hole in the ones you aren't going to eat, to let the steam out, then freeze, If left in the fridge they get soggy.


