Showing posts with label chicken. Show all posts

Paella Party - Olé!


It’s always nice to have friends, and not just when you need money or you’re your wife has thrown you out.  They’re especially wonderful when they can cook, and especially if they’ll teach you how.  Drinking you’ll have to learn on your own, although friends can be very helpful there, too.

I don’t disparage anyone’s cooking.  Great Cuisines cover the world.  None of them bad, unless you catch the Koreans on a night when they’ve run out of meat and you notice their dog isn’t barking.  Mexican menudo?…not a fan.

The Europeans in general?  Superb.  But, when it comes to the trifecta, drinking, eating, and partying,  the Spanish take a backseat to nobody.  These folks can start in the late afternoon and finish up with supper at midnight.  Everyone know the prime restaurant seating in Madrid is 10:30 p.m.?  Show up a couple of hours early and you’ll have the place to yourself.

Through my wife, I met a couple, he American, and she Spanish. Pili gives cooking lessons, which may also be classed as party lessons, or drinking lessons.  You gather hungry friends.  You make sangria.  You talk for hours and eat well, with discussions on anything that comes to mind after you've been hitting the sangria ... hard!


Lesson number one, Paella.  But with a Spanish woman, cooking is never just cooking.  It’s about having a few noshes to whet the appetite, washed down with wine, sangria, beer, whisky, or anything else that’s wet.  Then there’s an hour or more of conversation, and discussions on the merits of various foods, condiments, the prime importance of bread, and sentimental trips into the childhoods of everyone present.  The lips must be lubricated, as well as the stomach. 

Only Americans are willing to eat without conversation and a migratory pilgrimage to the kitchen. For the Spanish household, if you want to eat, these things are obligatory. Followed by chopping, dicing, and more intense drinking, interspersed with bubbling conversation and impromptu belly laughs.  Oh, yeah, also a few million instructions on creating Paella.  Pili is an exacting cook, which is a major reason why her paella is the stuff of hungry dreams.

If you’re not familiar with paella, here’re some hints.  Big, flat-bottomed pan. Rice. Seafood.  Chicken. Time. Patience.  If you don’t have the slow moving P word in abundance, make another plan.  Above all, paella takes time and preparation.

Let’s cut to the historic chase.  The dish dates only from the mid 19th Century. Paella comes from several words in several languages, all of them meaning pan.  The typical paella pan is round and flat-bottomed, with two-inch high sides that lean outward, and support opposing handles.  A lot of non-Spaniards think of paella as Spain’s national dish, but a Spaniard with tell you no, no, no (with a shake of the head and a wagging of the index finger)…it is a regional dish, from the east coast, specifically the region around the city of Valencia.  Lots of different types of paellas.  Truth is, you can put in any meat you want. 
The Spaniards do. 

You make paella in two parts, the pan cooking part and the broth part. Then you combine them with a finishing flourish and a swish of the spoon.

The Recipe (for 6-8 people)

Part I, initial cooking in the paella pan

Olive Oil (I use only Spanish olive oil!)
3 garlic cloves, thinly sliced.
1 small onion, diced
1 small green bell pepper diced
1 small red bell pepper, half of it diced and half of it cut in medium strips
2 large chicken breasts (or 4 thighs) skinned, boned, and cut in bite sized pieces
2 calamari steaks, cut in strips (easy to do with scissors)
2 medium tomatoes, peeled and diced
2 cups small grain rice (risotto rice works well)
1 cup small scallops
18-24 shrimp (cleaned)
12 mussels ( An hour before cooking, put them in cold, salty water.  This will wash out any grit.  )
A handful of peas (not canned, but frozen is ok)
1 lemon

Part II, The Broth

2 cloves garlic, mashed in a mortar, with salt and chopped parsley
4 cups fish or chicken broth
½ teaspoon smoked paprika
½ teaspoon colorante (either adobo or turmeric)
2 teaspoons chopped parsley (see garlic above)
pinch of saffron
salt to taste  (along the way, you will want to taste from time to time to make sure the paella or the broth is not too salty)

Putting it all together: (you’re going to be dancing back and forth from paella pan to broth.  Read carefully.  Stick with it!)

1.     Coat the bottom of the paella pan with olive oil. Add the 3 sliced garlic cloves and the calamari.  This is to flavor the oil.


2.     Lower the heat.  This is where patience comes in.  Add onions, peppers and peas, along with a bit of salt to help the vegetables sweat. Add the tomatoes. And stir them in.


3.     After a few minutes, take the garlic and calamari out and set aside.  You’ll use them later.


          As the vegetables slowly cook, make the broth in a separate saucepan.  This allows you to taste the broth and get the flavors and color perfect before you add it to the paella pan.  Pour the fish/chicken broth into the saucepan and add the paprika, colorante, reserved sliced garlic and mashed garlic, and a splash or two of either sherry or brandy.  This will help tenderize the meat when the broth is added to the paella pan. Use a white spoon to stir and you will be able to see that the broth is a rich yellow. If it’s too pale, add more colorante.  Cook the broth separately for about 15 minutes to let the flavors meld.


4.     Take the strips of red bell pepper out of the paella pan. They will be used to decorate the dish before serving.  Add the chicken pieces to the paella pan.
5.     Do not stir too much, only enough to turn the chicken.   Don’t worry about the chicken being uncooked.  The paella/chicken will continue to cook as more ingredients are added.


6.     Add rice to the paella pan and stir.  You want the rice to get a nice coating of oil and vegetable juices before you add the broth.
7.     Add the broth to the paella pan and stir quickly, then do not stir again.


8.     Add the prepped mussels to the paella pan. (Do not eat any mussels that have not opened after they are cooked.)  Cook for 15 to 20 minutes.
9.     With 5 minutes to go, decoratively add the scallops and shrimp on top.  Also add the reserved strips of red bell pepper and reserved strips of calamari.


10.  Taste to make sure the rice is cooked.  When it is cooked to your liking, cut a lemon decoratively and put the pieces on top of the paella.  Cover the paella with foil and let it rest for 10-15 minutes.


Remove the foil and serve the paella in a burst of steamy goodness.  Don’t forget the bread, salad, water, and more wine!


Watch your greedy guests smile!  Oh, well, they did bring the wine, right….I mean, they did, didn’t they??


Next lesson:  Tapas!

Chicken Pot Pie - Inspired by True Events!


For me, chicken pot pie is a warm memory of my mother’s kitchen.  She always made it from scratch, but that was a different era, when almost everything, including socks and baseballs, was made from scratch.  I loved her version. Later, some evil person, cursed be his name, introduced me to the perversion of clotty, tasteless muck you find in the frozen food section. For years I wandered in culinary purgatory.

Then, one happy day, I was in a London pub and a friend ordered the pub’s version of chicken pot pie.  I silently mourned his unfortunate choice.

He took a forkful, licked his lips and smiled.  Unexpected.  I had already cleared a path for him to make a galloping exit toward the Gents.

He offered me a bite.  Years of disgust faded like the memory of the time I discovered the difference between super glue and lubricant.   This was a heavenly blend of creamy flavors, dotted with herbs and sealed in a joyously flaky crust.  At that moment I made a vow to bring joy to the world with a startling reintroduction of chicken pot pie, as it should be.  Light. Delicious. Amazingly satisfying.  Needing only a soft white wine to bring comfort to the masses.  My gift to the world.

For the crust:

2 ½ Cups all-purpose flour
½ Tablespoon Salt
½ Cup (1 Stick) of chilled butter
½ Cup shortening
4 Tablespoons ice water

Mix the flour and salt.  Using forks or a pastry cutter, cut the shortening and butter into the flour.  Sprinkle on the ice water.  (I normally do a bit of this and that, but the ice water should be measured, or the dough will be too soggy.)

After cutting in the flour and shortening

After adding the ice water

Note:  Do not use a food processor to make pie dough.  The butter and shortening will be cut in too finely and the crust will not be as flaky.

Press the dough out into a rough circle, cover it front and back with plastic wrap and put it in the refrigerator for at least an hour.


For the Filling:

4 large chicken breasts  (1 ¾ pounds) cut into bite sized chunks
2 Cups chicken broth, plus another heaping tablespoon of granulated chicken broth, or one of the small cups of concentrated, jellied chicken broth, to intensify the flavor
1 Cup dry white wine
4 Cups sliced mushrooms
1 large onion, cut in quarters and sliced thinly
1 ½ Cups celery, chopped, including the leaves
1 large carrot, split and chopped
3 Tablespoons of chopped fennel leaves or tarragon, or another fresh herb
6 ounces of soft white cheese (I used a neutral cheese.  Brie or       Camembert will work, but will give a different flavor.)
1 Tablespoon butter
1 Tablespoon olive oil


Celery leaves add a lot of flavor

A very soft, neutral cheese


Heat the oven to 375ÂşF

In a large skillet (I used a 12 inch), add the butter, olive oil, wine, and one cup of chicken stock.  Next add a half-cup of celery and onion, plus the chicken.  Stir over medium heat.  (You want the chicken juice to remain, so do not use high heat.)  After 2-3 minutes, when the chicken has lost its pink color, add the remainder of the chicken stock, as well as the granulated chicken stock.  Stir and bring to a boil. 


As the mixture comes to a boil, add the mushrooms and remaining vegetables.  Sprinkle the fennel over the mixture and continue to cook and stir. Don’t worry if the skillet is full.  Vegetables cook down nicely.


When the chicken is cooked, stir in bits of the soft, white cheese.  When that is blended, remove the mixture from the heat, while you roll out the piecrust.

Put the chicken mixture in an oven proof baking dish and lay the rolled piecrust over the top.  With any excess dough, make crust decorations as desired, or as your wife insists. Remember to poke holes in the crust to allow steam to escape while it bakes.

Slide the chicken pot pie into the pre-heated oven and bake until the pie crust is golden.  About 35 minutes.


Serves 8 to 9 hungry folks.

I prefer hot chicken pot pie, but it is also good at room temperature.


Seattle!

Today I'm off to Seattle for a few days to visit my good friend Jodi. I was there over Christmas and New Years and had a fantastic time, and I know I'll have a fantastic time this trip, too. I also know the food will be amazing because Jodi is a ridiculously good cook and gourmand, and she has a Bradley smoker on her balcony she is not afraid to use!

This is the bourbon and orange marinated hickory smoked chicken she made on New Years Day:

This was so good you'd pay top dollar for it in a fancy restaurant, I swear.

Jodi is also famous for cookie breakfasts...(yes, we ate this for breakfast - several days in a row)...


...And epic turkey dinners with enough food to feed an army (there were two of us). The turkey she brined overnight - look at the colour it has!


I'll save the fondu photos for another time because I don't want anyone damaging any keyboards out there with all the drool I'm sure these photos are creating.

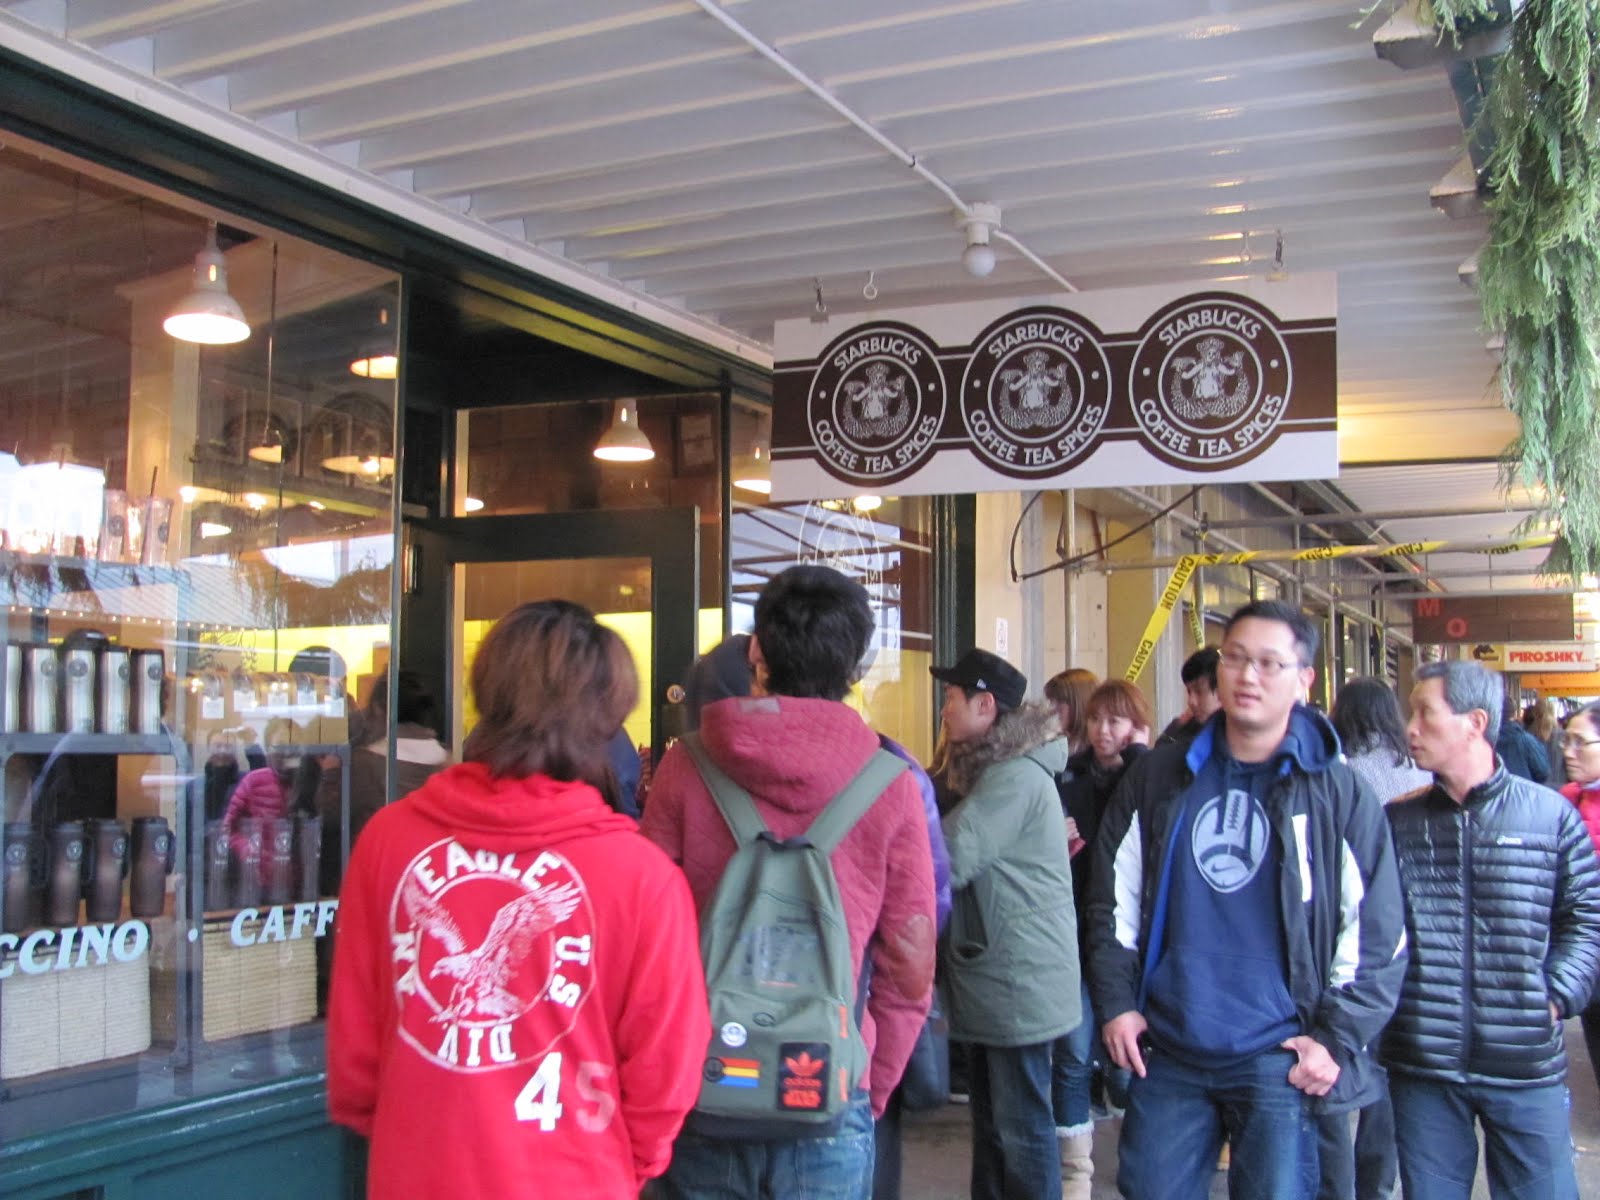
And of course, there is Starbucks in Seattle! This is the original, across from Pike Place Market. I snapped some photos but didn't go because there was always a huge line-up out the door! Luckily, on the walking route to Jodi's from Pike Place, there are plenty of Starbucks to choose from and they didn't have line-ups!

The West Coast adventure continues. And...I'm also going to Seattle again in April!

Thai Curry In A Hurry

Thai Curry with Tomato Chutney 
Chicken off the grill


Garnishes

Ah, Thailand.  Friendly people, great food, excellent prices, which reminds me of a trip to Krabi, on the southern coast, by an azure sea, with a beautiful beach, and fragrant coconut oil spread deliciously over…ah,but that’s another story.   I will say this.  There were vast amounts of Singha Beer involved and my recollection is as fuzzy as a cotton picker’s navel. 
Ok, curry.  Thai curry.  How is that different from Indian curry?  Are you nuts?  Taken leave of your senses?  Everyone knows that Indian curry comes from London and Thai curry comes from a really cute chick wearing a sarong.
This time, let’s forego the distant travel (biting tongue, holding back tears) and bring Thai curry to our own kitchen.  But, before we get started, let’s get one thing straight.  There are as many different Thai curries as there are Thai cooks.  So mine isn’t the Thai curry you remember from the drunken weekend in Bangkok? Dry up, quit whining, and pass me an icy bottle of Singha. 
A recipe for Tomato Chutney follows the curry recipe.

The Curry Recipe:

5 boneless, skinless chicken breasts or thighs, trimmed
5 cloves garlic, minced
2-3 Tablespoons peanut, or other vegetable oil (30-45 grams)
1 yellow onion, peeled and sliced thinly (onion about the size of your fist)
2 14 oz cans coconut milk (.8 Liters) Open them one at a time.  You’ll see why in a minute.
3 Tablespoons curry powder (or to taste) I use a mixture of hot and mild.
1-2 Tablespoons garam masala.   I know this is an Indian mixture, but I like it.  Don’t have any?  Just season as necessary with more curry powder.
            2 Tablespoons fish sauce
            1 teaspoon salt (or to taste)
            Black pepper for the chicken

Garnish: lemon wedges, fresh cilantro leaves, dried coconut, peanuts, cayenne pepper

1.     Salt and pepper the chicken pieces, and grill them.  When they’re done, cut into one-inch cubes.  For my European friends, an inch is about 2.5 mm
2.     As the chicken is grilling, heat the oil in a pan, add the garlic and stir.  Add the sliced onion and cook until wilted.
3.     Add the chicken, the first can of coconut milk, all the spices, and the fish sauce, and cook until all the spice is blended and the sauce begins to thicken.  If you don’t have enough sauce, add all or part of the second can of coconut milk.  Taste and add more salt, or spice as necessary.
4.     Serve over rice and garnish individually.

Tomato Chutney


I like to serve tomato chutney with my curry, even though it is definitely not Thai.
Easy to make.  Difficult to forget.

            1 Tablespoon oil
            1 Tablespoon red pepper flakes
            1/4 teaspoon nutmeg
            1/4 teaspoon mustard seeds
2 cans diced tomatoes, undrained
            1/2 lemon
            1/3 cup raisins
            1/2 cup sugar
            1/2 teaspoon salt

            Heat the oil in a pan and add the spices.  When the seeds start to jump, add the tomatoes.  Thin slice the lemon half and place the slices over the tomato mixture.  Cook for about 15 minutes, stirring frequently, until the sauce has thickened.  Stir in the raisins, sugar, and salt.  Stir until all sugar is melted and the sauce is consistent.

            Taste a scrumptious bite of the curry.  Takes you back, doesn’t it.  Makes you wish you were single, I mean you had more than a single serving.  Several questions about my Thai curry are constantly thrown my way.  Will Thai curry cause your heart to flutter and your eyes roll back?  No, but it will make you forget Budweiser, fill your nostrils with a strong scent of coconut oil, and leave you yearning for the beach.  Will Thai curry increase your sexual awareness to the point that your dog whines, while your wife, and many of the neighbors pretend to be asleep?  Likely, but no personal experience.  Wink, wink.
Related Posts Plugin for WordPress, Blogger...