
Showing posts with label desserts. Show all posts
Showing posts with label desserts. Show all posts
Blackberry Upside Down Cake
Yes, another upside down cake! I'm on a roll. I got the blackberries from a vacant lot next door to where I used to live up in North Surrey. They're a bit seedy and they are not the greatest tasting blackberries ever despite how beautiful they were on the bush, but they just need a little extra help with some sugar and they're fine. I made this cake two nights ago, once again using Betty Crackpot's Dinette Cake recipe.

Cooking with Betty Crackpot: Pie Crust & Rhubarb Pie
I just wanted to post a pic of the rhubarb pie I made last week, from the rhubarb plant at my friends' place. Two of the friends were rhubarb virgins and one didn't care for the stuff. Well, I am happy to say I have made three rhubarby converts! Yesssss!!!
I made them a pie, and here it is. The pastry recipe is Betty Crackpot's - again. It's a no-fail recipe, really. You can find it here.
And here is the pie, complete with a pretty lattice and everything.

I made them a pie, and here it is. The pastry recipe is Betty Crackpot's - again. It's a no-fail recipe, really. You can find it here.
And here is the pie, complete with a pretty lattice and everything.
A Pair of Upside Down Cakes/Cooking with Betty Crackpot
I am currently facilitating a baking group at my local mental health clubhouse, which is part of my volunteer requirements for the peer support training program I'm in. Once a week, we bake something simple that can be accomplished in 2 hours, and recently I was asked if I could use up a pineapple that the clubhouse had on had that had gone overripe. It was a pretty pathetic looking specimen, but once I cut into I thought it would be OK for a pineapple upside down cake. I sliced up the pineapple and went ahead with the project.
It turned out superbly! The recipe for the cake is Betty Crackpot's Dinette Cake, and you can find that recipe here. For the upside down part of the cake, i.e. the bottom, mix together 1/4 cup melted butter and 1/2 cup of packed brown sugar. Spread evenly over the bottom of the cake pan. Arrange pineapple slices on top, make the cake batter, then spread it evenly over the pineapple. I know this is supposed to have maraschino cherries in it, but honestly, it didn't need them (and they're not in my budget). Here is the cake!
Also, very recently, I went over to some friends' place and divested them of all their rhubarb. Two of these friends had never had rhubarb before, and one didn't like it, so the rhubarb plant was basically going to waste. After the success of my pineapple upside down cake, I decided to make a rhubarb version. And this is it:
Same deal with the bottom, except rhubarb needs a bit of help. I used about a cup and a half of finely chopped rhubarb, and combined it with about 1/4 cup of sugar, and some cinnamon & ground ginger.
This was TO.DIE.FOR. In fact, it's one of the best things I think I've ever baked!

I loved it! And I ate 3/4 of it in four days, I'm slightly sheepish to admit. I gave the other quarter to a friend.
I have in the freezer a bag of wild blackberries. I think I'll make a blackberry upside down cake next!
It turned out superbly! The recipe for the cake is Betty Crackpot's Dinette Cake, and you can find that recipe here. For the upside down part of the cake, i.e. the bottom, mix together 1/4 cup melted butter and 1/2 cup of packed brown sugar. Spread evenly over the bottom of the cake pan. Arrange pineapple slices on top, make the cake batter, then spread it evenly over the pineapple. I know this is supposed to have maraschino cherries in it, but honestly, it didn't need them (and they're not in my budget). Here is the cake!
 |
| Pineapple Upside Down Cake |
 |
| Rhubarb Upside Down Cake |
This was TO.DIE.FOR. In fact, it's one of the best things I think I've ever baked!
I loved it! And I ate 3/4 of it in four days, I'm slightly sheepish to admit. I gave the other quarter to a friend.
I have in the freezer a bag of wild blackberries. I think I'll make a blackberry upside down cake next!
Lemon "Brownies"
I have been back on Pinterest - that's how bored I am! What a time-sucker it is. But it's irresistible at the same time. I have posted a few recipes I've found there on here, but then they marked this blog as spam and I was pissy about it, sent an email, which was never responded to, and then I promptly left the site for over a year and a half. Now I am back...and once more addicted.
 There is so much food on Pinterest it's ridiculous. I found this recipe for Lemon Brownies the other day and was immediately intrigued. I love a good lemon square, but this was a different kind of bar, so I wanted to try it. There is a bit of risk with Pinterest recipes; some of them don't turn out and you never really know if they're as tried and true as they claim to be. But this worked out wonderfully, despite the fact that there is no leavening agent in it. I was worried about that small detail; I thought perhaps the cake part of the brownie would turn out like a chunk of cement. I needn't have worried. Though I slightly over baked it, the cakey part was just great.
I took them to a dinner for dessert and they were a big hit! I will definitely make these again!
The recipe is here.
Enjoy!
I took them to a dinner for dessert and they were a big hit! I will definitely make these again!
The recipe is here.
Enjoy!
Cooking with Betty Crackpot: Apple Crisp
This is one of the easiest, satisfying desserts you can make and the versatility with it is huge. I chose to make this particular recipe because my young, almost eight year old roommate, R, had claimed that she'd never had apple crisp before. If she had, she said it wasn't that memorable. Well, I wanted to change her life with a memorable apple crisp and I thought Betty would for sure come through for me, since this is a basic, but delicious recipe. NOTE: I don't normally make my crisp this way, but whatever. I stayed true to the recipe for the sake of the series!
 Apple Crisp, from page 177 of Betty Crocker's Cookbook, 1969 version
4 cups sliced pared tart apples (about 4 medium)
2/3 - 3/4 cup brown sugar, packed
1/2 cup flour
1/2 cup oats
3/4 tsp cinnamon
3/4 tsp nutmeg
1/3 cup butter or margarine, softened
Heat oven to 375F. Grease square pan, 8x8x2". Place apple slices in pan. Mix remaining ingredients thoroughly. Sprinkle over apples. Bake 30 minutes or until apples are tender and topping is golden brown. Serve warm and, if desired, with light cream or ice cream.
I thought this was pretty good. It was definitely crispy and crunchy. The flavour and texture was great. I served it with a bit of whipping cream.
R's verdict: it was "OK." Well, I guess I didn't change her life after all.
R's mom, T, loved it though. We almost ate the whole pan that night.

4 cups sliced pared tart apples (about 4 medium)
2/3 - 3/4 cup brown sugar, packed
1/2 cup flour
1/2 cup oats
3/4 tsp cinnamon
3/4 tsp nutmeg
1/3 cup butter or margarine, softened
Heat oven to 375F. Grease square pan, 8x8x2". Place apple slices in pan. Mix remaining ingredients thoroughly. Sprinkle over apples. Bake 30 minutes or until apples are tender and topping is golden brown. Serve warm and, if desired, with light cream or ice cream.
I thought this was pretty good. It was definitely crispy and crunchy. The flavour and texture was great. I served it with a bit of whipping cream.
R's verdict: it was "OK." Well, I guess I didn't change her life after all.
R's mom, T, loved it though. We almost ate the whole pan that night.
Cooking with Betty Crackpot: Kitty Cat Cake!
 Growing up with my mom's Betty Crocker cookbook from 1969 was a key element in creating my love for baking and cooking, and I've mentioned before on this blog how, as a kid, I just used to love to curl up with the book and look at the cake pictures. To a child, they looked marvelous. To me as a woman pushing 40, they look quite amateurish, but they still have a lot of charm to them. The cat cake (instructions on page 116) always tickled my fancy, and my mom and I did make it together. I don't have any photos of it, but I remember my mom using yellow smarties for the eyes and snipping lengths of black licorice for the whiskers. I did find a picture of the Betty Crocker version of the cake online, so that's what you see to the right.
Last weekend, while at Jodi's, Jodi decided it was high time to indulge in her own cat cake dreams and make the the cake herself, which she didn't have the joy of making as a child. She used the Silver White Cake recipe from page 94, and the recipe for that is HERE. The cake came out great; it's indeed very white and just like the Dinette Cake, it was fluffy and moist and plain awesome.
And now, let me present to you, Jodi's Kitty Cat Cake! She used Dots candy for the eyes and paws and piped on the whiskers with melted chocolate.

 Cute, eh? The frosting is Betty's Chocolate Butter Frosting from page 125.
 Betty Crocker's Chocolate Butter Frosting (page 125 of the 1969 edition)
⅓ cup soft butter or margarine
2 ounces melted unsweetened chocolate (cool)
2 cups confectioners’ sugar
1 ½ teaspoons vanilla
About 2 tablespoons milk
Mix thoroughly butter and cooled chocolate. Blend in sugar. Stir in vanilla and milk; beat until frosting is smooth and of spreading consistency.
Fills and frosts two 8- or 9-inch layers or frosts a 13x9-inch cake.
There was just enough frosting for the cat cake.
There you go! Another Betty Crackpot success!
Flourless Chocolate Truffle Cake
I mentioned this dessert in yesterday's post, saying that it was our finale to quite the slap-up Easter dinner. Here is a shot of said Easter dinner! The T-bones were courtesy my roommate, T.

Now, onto dessert. The April issue of Canadian Living was just chock full of recipes I bookmarked. The beef bulgogi was one of them, in fact. This chocolate cake was part of the Passover menu in that issue, and I knew upon seeing it that this was destined to be a product of my kitchen sooner than later.
The recipe is HERE.
 The results were stupendous. So stupendous, in fact, there just aren't words. This was rich, fudgey, decadent, and just plain fabulicious. It was so fabulicious it's ridiculously ridiculous.
It was easy to make, too, so there is a huge gratification factor for not a lot effort, too. The only minor issue I had was that the topping used water in it instead of cream. I suspect this has something to do with Jewish kosher rules, but if you're not worried about that, I'd make this with cream instead of water. This is because water does not mix with fat well, and there is butter and chocolate in this topping, and they didn't combine well. The butter kind of separated and left buttery streaks through the top. Flavour-wise, the topping was smashing (I upped the instant espresso powder a bit), but when - WHEN not IF - I make this again, I'll make the topping with cream.
T and I were over the moon with this, and since there were just two of us last night, there are plenty of leftovers. Yay!

Now, onto dessert. The April issue of Canadian Living was just chock full of recipes I bookmarked. The beef bulgogi was one of them, in fact. This chocolate cake was part of the Passover menu in that issue, and I knew upon seeing it that this was destined to be a product of my kitchen sooner than later.
The recipe is HERE.
 The results were stupendous. So stupendous, in fact, there just aren't words. This was rich, fudgey, decadent, and just plain fabulicious. It was so fabulicious it's ridiculously ridiculous.
It was easy to make, too, so there is a huge gratification factor for not a lot effort, too. The only minor issue I had was that the topping used water in it instead of cream. I suspect this has something to do with Jewish kosher rules, but if you're not worried about that, I'd make this with cream instead of water. This is because water does not mix with fat well, and there is butter and chocolate in this topping, and they didn't combine well. The butter kind of separated and left buttery streaks through the top. Flavour-wise, the topping was smashing (I upped the instant espresso powder a bit), but when - WHEN not IF - I make this again, I'll make the topping with cream.
T and I were over the moon with this, and since there were just two of us last night, there are plenty of leftovers. Yay!
New Series: Cooking with Betty Crackpot
 I was having a bad day today, but it wasn't a complete write-off because I came up with a new idea, a series for this blog based on recipes from my mom's 1969 copy of Betty Crocker's Cookbook. I've mentioned several times here that I grew up with this book and that it was partially responsible for my wanting to become a baker. Last fall, I was on holiday in PEI, where my mom lives, and I asked her if she still had the book, and she did! It's a little worse for wear - the spine is missing and the binding is falling apart, and it's stained and dog-eared and definitely "well-loved" - and after not very much convincing at all, Mom let me take the book home with me.
Growing up, my mom always wittily referred to Betty Crocker as Betty Crackpot, and it stuck with me (why wouldn't it?), so that's why I'm going with it for the title of the new series. This book has everything under the sun in it, and the food styling is absolutely horrendous by contemporary standards. My aim is to reacquaint myself with some childhood favourites for nostalgia purposes, as well as try out some new old funky stuff that might be good - or not. I also aim to entertain! I'll try to stay as true as possible to the original recipes, except I will not be using any vegetable shortening and I'll probably cut down on the fat a bit because, man, some of these recipes are decidedly not healthy. Then there will be things I can't find because maybe they don't make them anymore. I should be interesting, and it should be fun.
 First up, something not very unusual or unattractive Dinette Cake, found on page 97. I believe this is the batter we made when I first used my Easy Bake Oven when I was very young. It's a very simple recipe, but the method of beating the crap out of the batter seemed counter-intuitive to me. But nonetheless, I beat the batter as the directions stated.
Dinette Cake, Betty Crocker's Cookbook, page 97
1 ½ cups cake flour or 1 ¼ cups all-purpose flour
1 cup sugar
1 ½ teaspoons baking powder
½ teaspoon salt
¾ cup milk
⅓ cup shortening
1 egg
1 teaspoon vanilla
 Heat oven to 350°F. Grease and flour square pan, 8x8x2 or 9x9x2 inches. Measure all ingredients into large mixer bowl. Blend ½ minute on low speed, scraping bowl constantly. Beat 3 minutes high speed, scraping bowl occasionally. Pour into pan.
Bake 35 to 40 minutes or until wooden pick inserted in center comes out clean. Cool.
The original recipe suggests Peppermint Cream Cheese Frosting or Coconut Broiled Topping.
I chose no topping because I have homemade mint chocolate chip ice cream on hand!
As you can see there are some darker brown spots on the surface of the cake; this is because there were a lot of air bubbles in it as it baked. I used an 8x8" pan.
And the finished product:

The verdict: OMG, so awesome! I could have eaten the whole thing on my own. The texture was amazing, the flavour was amazing...The beating of the batter didn't seem to harm the texture of the cake, which was good. Such a simple recipe with such a super result. And the scent of it really brought back memories...Yum!
Cream Egg Brownies
Here is another Pinterest find that I couldn't resist. I do loves me a Cadbury Cream Egg around Easter time, though I prefer the mini eggs because they're less sweet. I thought this brownie idea was pretty fracking brilliant. And I had all the ingredients on hand, so that was cool, too. Thanks to my roommate T for having a huge bag of milk chocolate chips on hand!
The original recipe is HERE.
Here is my product:


I had one issue with the recipe and that was the filling: 1/4 cup of corn syrup wasn't enough moisture to absorb all the icing sugar, so I had to add some whipping cream to it to loosen it up.
I don't have any yellow food colouring at the moment, so I didn't bother tinting part of the filling.
These were a huge hit with my roommate, who claimed they were better than a cream egg. This recipe has been kid-tested and approved, too, by my young roommate, R, and her friend who was over playing when I made these.
Definite keeper of a recipe!
The original recipe is HERE.
Here is my product:


I had one issue with the recipe and that was the filling: 1/4 cup of corn syrup wasn't enough moisture to absorb all the icing sugar, so I had to add some whipping cream to it to loosen it up.
I don't have any yellow food colouring at the moment, so I didn't bother tinting part of the filling.
These were a huge hit with my roommate, who claimed they were better than a cream egg. This recipe has been kid-tested and approved, too, by my young roommate, R, and her friend who was over playing when I made these.
Definite keeper of a recipe!
Homemade Ice Cream Sandwiches
I have a lot of very specific PMS cravings, and the craving of this month was ice cream sandwiches. These things are so random and it's quite baffling at times. So anyway, I tried to resist this craving with all the willpower I could muster because when I have PMS cravings I tend to eat a large amount of that particular food, and who needs to eat a case of ice cream sandwiches? But my willpower only lasted so long, and after fuming about this for more time than I should have spent fuming about it, I popped down to the end of the block to the locally overpriced convenience store (henceforth known as LOCS) to purchase an ice cream sandwich. Or two.
Well, I'm not used to convenience store prices and one particular ice cream sandwich, made by Klondike, was $3.99. No way was I going to pay that, so instead I went with the more affordable Oreo option for $2.49. I bought two.
I heartily enjoyed both sandwiches - on different nights, I assure you. But while I eating the first one, I thought, man, I can make an ice cream sandwich myself and not have to put up with LOCS pricing at all! It does not take a brain surgeon to make an ice cream sandwich. You need cookies, you need ice cream. I can make both. So I did.
In the March 2012 issue of Food Network Magazine, there were a bunch of chocolate chip cookie recipes, and one looked like it would make good ice cream sandwich components: the cakey chocolate chip cookie.
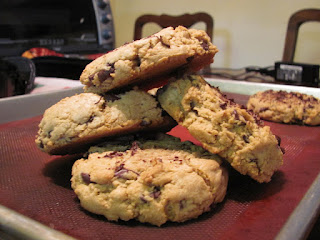 I made this recipe. I wanted good, hearty chocolate chip cookies, but also soft ones that would be easy to bite into. I made the cookies very large - we would call these "bake shop size" in culinary school. I portioned them out using my #16 cookie scoop, which is approximately 1/2 cup in volume. I got about 12 cookies. I didn't refrigerate the dough as the recipe specifies, but I did stick it in the deep freeze until it was firm.
They were monstrous! But I didn't care because I wanted monstrous ice cream sandwiches.
While the cookies were baking I made vanilla ice cream with my trusty Cuisinart ice cream maker and my usual egg-less recipe that I've had a lot of success with:
2 cups whipping cream (35%)
1 cup whole milk (3%)
3/4 cup sugar
vanilla, to taste
Once the cookies were cooled and the ice cream set in the freezer for a couple of hours, this is what I got:

Pretty big, eh? Well, I wanted big and hearty, and that's certainly what I got.
And man, did it ever hit the spot! Excellent!
In fact, I'm going to go and have one now...
Well, I'm not used to convenience store prices and one particular ice cream sandwich, made by Klondike, was $3.99. No way was I going to pay that, so instead I went with the more affordable Oreo option for $2.49. I bought two.
I heartily enjoyed both sandwiches - on different nights, I assure you. But while I eating the first one, I thought, man, I can make an ice cream sandwich myself and not have to put up with LOCS pricing at all! It does not take a brain surgeon to make an ice cream sandwich. You need cookies, you need ice cream. I can make both. So I did.
In the March 2012 issue of Food Network Magazine, there were a bunch of chocolate chip cookie recipes, and one looked like it would make good ice cream sandwich components: the cakey chocolate chip cookie.
 I made this recipe. I wanted good, hearty chocolate chip cookies, but also soft ones that would be easy to bite into. I made the cookies very large - we would call these "bake shop size" in culinary school. I portioned them out using my #16 cookie scoop, which is approximately 1/2 cup in volume. I got about 12 cookies. I didn't refrigerate the dough as the recipe specifies, but I did stick it in the deep freeze until it was firm.
They were monstrous! But I didn't care because I wanted monstrous ice cream sandwiches.
While the cookies were baking I made vanilla ice cream with my trusty Cuisinart ice cream maker and my usual egg-less recipe that I've had a lot of success with:
2 cups whipping cream (35%)
1 cup whole milk (3%)
3/4 cup sugar
vanilla, to taste
Once the cookies were cooled and the ice cream set in the freezer for a couple of hours, this is what I got:

Pretty big, eh? Well, I wanted big and hearty, and that's certainly what I got.
And man, did it ever hit the spot! Excellent!
In fact, I'm going to go and have one now...
Crumb Cake Heaven
Yes, another post about baking Jodi did while I was visiting her recently! This time, a heavenly crumb cake with tons of crumb topping that was probably my favourite thing she made while I was there.

Jodi found the recipe here. Funnily enough, it originated from a Cook's Illustrated issue from 2007, which we found ironic after this post & video, but Jodi assured me there weren't 80 ingredients in it and the recipe was easy to follow. :)
Yes, the amount of crumb topping on this cake was very impressive. Usually, crumb cakes don't have enough crumbs on them for my liking, but this cake was not lacking in that department at all. Also the texture of the cake was blissfully velvety, probably due to the fact that it was made with cake flour. The recipe states that one should not substitute the cake flour with regular all purpose flour; I'd concur with that after eating the cake - it would not have been the same.

We ate quite a bit of the cake in one day, but Jodi did pack me with two slabs to take home with me on the train, for which I am very grateful. I'm definitely going to have to try this one out myself, soon.

Jodi found the recipe here. Funnily enough, it originated from a Cook's Illustrated issue from 2007, which we found ironic after this post & video, but Jodi assured me there weren't 80 ingredients in it and the recipe was easy to follow. :)
Yes, the amount of crumb topping on this cake was very impressive. Usually, crumb cakes don't have enough crumbs on them for my liking, but this cake was not lacking in that department at all. Also the texture of the cake was blissfully velvety, probably due to the fact that it was made with cake flour. The recipe states that one should not substitute the cake flour with regular all purpose flour; I'd concur with that after eating the cake - it would not have been the same.

We ate quite a bit of the cake in one day, but Jodi did pack me with two slabs to take home with me on the train, for which I am very grateful. I'm definitely going to have to try this one out myself, soon.
Vietnamese Lunch
As I said in Sunday's post, I no longer have to rely on LOGS and there is a great variety of places to grocery shop down here. One of my favourite places to go is T&T Supermarket, a large Chinese chain. And I have one within walking distance! Needless to say, I go there often. They have good prices and because it's a large chain, the variety is stunning. The exotic ingredients are both puzzing (pigs uteri) and exciting (fresh keffir lime leaves). The store closest to me has a food court, too, and it has several different cultures represented there. There is Korean food, Thai food, Japanese food, of course Chinese food, and one place I've been to a couple of times, Vietnamese food.
I have always enjoyed Vietnamese food, and one of my favourites is salad rolls with shrimp. I've ordered these a couple of times, for the not-so-bad price of $4.75. They are made fresh (unlike Save-on Foods' ones, which are terrible) and come with a tangy sauce.

But look at what else is in theses salad rolls. On the bottom, there are a couple of slices of that pale sausage similar to the one I encountered in my pho experience last year. I was a little surprised when I first saw this, but once I tried it, I really liked it. The sausage is very mild in flavour and is a touch - just a touch - salty. It's really good!
I also tried something new at my last trip there, Vietnamese carioca. They were described as deep fried rice balls, and I could see that they were coated in coarse sugar and drizzled with caramel. But when I bit into one, it was like biting into soft, mushy marshmallow. They were not balls of whole grain rice. I think this is more of a rice flour dumpling, deep fried. And they were really good! The texture of the balls was quite decadent and they used real caramel for the drizzle, not a caramel sauce. That really impressed me.

Lunch that day was yummy, and it only cost $6!
I have always enjoyed Vietnamese food, and one of my favourites is salad rolls with shrimp. I've ordered these a couple of times, for the not-so-bad price of $4.75. They are made fresh (unlike Save-on Foods' ones, which are terrible) and come with a tangy sauce.

But look at what else is in theses salad rolls. On the bottom, there are a couple of slices of that pale sausage similar to the one I encountered in my pho experience last year. I was a little surprised when I first saw this, but once I tried it, I really liked it. The sausage is very mild in flavour and is a touch - just a touch - salty. It's really good!
I also tried something new at my last trip there, Vietnamese carioca. They were described as deep fried rice balls, and I could see that they were coated in coarse sugar and drizzled with caramel. But when I bit into one, it was like biting into soft, mushy marshmallow. They were not balls of whole grain rice. I think this is more of a rice flour dumpling, deep fried. And they were really good! The texture of the balls was quite decadent and they used real caramel for the drizzle, not a caramel sauce. That really impressed me.

Lunch that day was yummy, and it only cost $6!
Lunch at Ikea
You know the deal: you move and all of a sudden you need bits and pieces of crap. And where else would you go to find said bits and pieces of crap besides Ikea (if you have one available to you, and I do now)? Luckily, my dad loves Ikea and whenever he's down here, he likes to go there and putter around for a few hours. He particularly likes Ikea's cafeteria. He drove me back from the Kootenays when I went to visit last month, and he stayed a few extra days to visit with my brother & SIL. I needed bits and pieces of crap for my new place, and Dad wanted to putter around. He also loves Ikea's food section & buys coffee beans from there whenever he can. We spent over 3 hours in Ikea one rainy afternoon, and started out with lunch.
There really wasn't anything on the menu that appealed to me, so I went with this Naiad Salad plate consisting of gravalax and a root vegetable salad in a citrus vinaigrette. It was accompanied by two crackers. For dessert, I had a piece of apple cake.
The salmon dish cost $7.95 or something ridiculous like that, and it came with a lot of gravalax! You wouldn't be able to buy that amount of salmon lox in the grocery store for that price. It was very good as was the root vegetable salad. The apple cake was OK. My dad had a bunch of things but I didn't get a picture. He was very happy indeed. Until we had to try to fit a flat-packed bookcase in his Subaru. But that's another story. :)

There really wasn't anything on the menu that appealed to me, so I went with this Naiad Salad plate consisting of gravalax and a root vegetable salad in a citrus vinaigrette. It was accompanied by two crackers. For dessert, I had a piece of apple cake.
The salmon dish cost $7.95 or something ridiculous like that, and it came with a lot of gravalax! You wouldn't be able to buy that amount of salmon lox in the grocery store for that price. It was very good as was the root vegetable salad. The apple cake was OK. My dad had a bunch of things but I didn't get a picture. He was very happy indeed. Until we had to try to fit a flat-packed bookcase in his Subaru. But that's another story. :)

Pumpkin Chiffon Pie
I had the opportunity to do some catering last month during a trip back home, and one of the jobs was to prepare a banquet lunch for a seniors curling bonspiel. The food was copious and excellent, and it was very well-received. The menu included a stuffed chicken, a rich potato casserole, and a selection of pies, including this pumpkin chiffon pie recipe. This has been a favourite of my SIL's mom, C's, family for holiday gatherings, and this time we made it in bulk. It was delicious. The chiffon filling is like a pumpkin mousse; I might use the mousse for a cake filling one of these days as I can see it being very versatile. The recipe comes via C's sister, B.
 Pumpkin Chiffon Pie
1 9" pie shell, blind baked and cooled
1 envelope gelatin
3/4 cup sugar, divided
1 tsp cinnamon
1/2 tsp salt
1/2 tsp ginger
1/4 tsp nutmeg
2/3 cup evaporated milk
3 eggs, separated, yolks lightly beaten
1 1/4 cup pumpkin puree
Combine gelatin and 1/2 cup sugar, salt, and spices. Stir in the milk and beaten egg yolks. Cook, stirring constantly, over low heat, until thickened to custardy consistency. Whisk in pumpkin and chill.
Beat egg whites to stiff peaks, gradually adding the remaining 1/4 cup of sugar. Fold into cooled pumpkin. Pour into shell and chill. Serve with whipped cream.
We also made lemon meringue pies. Here's a peak at those, too.
 Enjoy!
 Pumpkin Chiffon Pie
1 9" pie shell, blind baked and cooled
1 envelope gelatin
3/4 cup sugar, divided
1 tsp cinnamon
1/2 tsp salt
1/2 tsp ginger
1/4 tsp nutmeg
2/3 cup evaporated milk
3 eggs, separated, yolks lightly beaten
1 1/4 cup pumpkin puree
Combine gelatin and 1/2 cup sugar, salt, and spices. Stir in the milk and beaten egg yolks. Cook, stirring constantly, over low heat, until thickened to custardy consistency. Whisk in pumpkin and chill.
Beat egg whites to stiff peaks, gradually adding the remaining 1/4 cup of sugar. Fold into cooled pumpkin. Pour into shell and chill. Serve with whipped cream.
We also made lemon meringue pies. Here's a peak at those, too.
 Enjoy!
Magazine Monday #82: Pumpkin Coconut Pound Cake
In addition to having a lot of frozen rhubarb on hand to use up before I move at the end of September when I move to the coast, I also have a ton of pumpkin in the freezer I really don't want to go to waste, either. I have a lot of pumkin recipes kicking around, and this one I have had in my binder for a few years; it's from Cooking Pleasures Magazine, which I used to get with my membership in the Cooking Club of America. I let my membership to this lapse a few years ago because it was getting too expensive with all my other various subscriptions (which have also gone by the wayside by now, too) but I still have quite a few recipes I've saved I want to try.
I made this last week and gave it to some family members to eat; I certainly didn't need an entire cake hanging around my house, especially as it was my birthday and I knew I was going to have lots of leftovers from my celebration (more about that later). I did take one slice, however, just to taste. I'll give you my critique after the recipe! Originally, this recipe is accompanied by a creamy vanilla sauce, but I didn't do that. I also didn't add the pecans as I had just used mine up in another project.
 Pumpkin-Coconut-Pecan Pound Cake, from Cooking Pleasures Magazine
1 cup butter
2 cups sugar
4 eggs
1 can (15oz) pumpkin puree (I used 2 cups of my own pumpkin puree)
2 tsp vanilla extract
3 cups all purpose flour
2 tsp baking powder
1 tsp baking soda
1 tsp ground cinnamon
1/2 tsp ground nutmeg
1/4 tsp salt
1/2 cup sweetened flaked coconut (I used unsweetened)
1/2 cup chopped pecans
1. Preheat oven to 350F. Grease & flour a 12-cup bundt pan. In a large bowl, beat the butter until light & fluffy. Beat in the sugar until light & fluffy. Add eggs one at a time, beating well after each addition. Beat in pumpkin & vanilla until well combined. Mixture will look curdled.
2. In another bowl, whisk together the dry ingredients. At low speed, slowly add them to the wet ingredients. Fold in coconut & pecans.
3. Spoon into prepared pan & bake...about an hour or so, or until done.
4. Cool & serve!
Now I really liked the combination of pumpkin & coconut. I love both flavours and they work well together. But this cake wasn't super pumpkin-y, which was disappointing. The colour was a bit pale. I also over-baked this slightly, so it was a bit dry. My bad for sure. The taste was good and I would try this again, just perhaps with a bit more pumpkin in it and I'd be a little more careful with the baking time.
If you make it, let me know how it goes!
I made this last week and gave it to some family members to eat; I certainly didn't need an entire cake hanging around my house, especially as it was my birthday and I knew I was going to have lots of leftovers from my celebration (more about that later). I did take one slice, however, just to taste. I'll give you my critique after the recipe! Originally, this recipe is accompanied by a creamy vanilla sauce, but I didn't do that. I also didn't add the pecans as I had just used mine up in another project.
 Pumpkin-Coconut-Pecan Pound Cake, from Cooking Pleasures Magazine
1 cup butter
2 cups sugar
4 eggs
1 can (15oz) pumpkin puree (I used 2 cups of my own pumpkin puree)
2 tsp vanilla extract
3 cups all purpose flour
2 tsp baking powder
1 tsp baking soda
1 tsp ground cinnamon
1/2 tsp ground nutmeg
1/4 tsp salt
1/2 cup sweetened flaked coconut (I used unsweetened)
1/2 cup chopped pecans
1. Preheat oven to 350F. Grease & flour a 12-cup bundt pan. In a large bowl, beat the butter until light & fluffy. Beat in the sugar until light & fluffy. Add eggs one at a time, beating well after each addition. Beat in pumpkin & vanilla until well combined. Mixture will look curdled.
2. In another bowl, whisk together the dry ingredients. At low speed, slowly add them to the wet ingredients. Fold in coconut & pecans.
3. Spoon into prepared pan & bake...about an hour or so, or until done.
4. Cool & serve!
Now I really liked the combination of pumpkin & coconut. I love both flavours and they work well together. But this cake wasn't super pumpkin-y, which was disappointing. The colour was a bit pale. I also over-baked this slightly, so it was a bit dry. My bad for sure. The taste was good and I would try this again, just perhaps with a bit more pumpkin in it and I'd be a little more careful with the baking time.
If you make it, let me know how it goes!
My Miura Waffle Bar Experience
 Sometimes there are things you just HAVE to do. You see them, you drool, you get a tingly sensation, and you just KNOW that THIS IS FOR YOU. Such was the case when my friend Jodi told me about an eatery in Vancouver she saw on a food blog, and knowing that I was making a trip to the coast in the imminent future, she strongly recommended I try it so when she and I get together for the first time in person in October, I could wholeheartedly throw my own recommendation behind it and we could go there together. This eatery is the Miura Waffle Bar on Davie St. right in downtown Vancouver.
The post Jodi initially saw this place on is here. When I looked at this myself, I just about died! It looked fan-freaking-tastic, and a visit to the Miura site further convinced me that this was a MUST for my trip to Van, which I just came back from on Tuesday. I immediately alerted my brother & SIL, who live right downtown Vancouver, to the place, only to have my SIL alert me that they'd been already and they thought it was totally awesome.
 I got the chance to go to Miura last Saturday, a spectacular day in which I met a friend for a small lunch and a browse around Granville Island Market, and then after taking the Aquabus over False Creek, I met my brother Jem outside his film school campus on Hornby St. Miura was on our way back to his place, so we stopped in. He was very ill and not interested in a waffle, but he did order a flavoured milk, as that is Miura's other specialty.
As soon as I saw the Miura site well before my trip, I knew what I was going to order: the Tiramisu Waffle Sando. It was a tough call given the other stuff on their menu, but I just knew the tiramisu option was for me, because tiramisu is one of my all-time favourite desserts.
For $4.49 you can't go far wrong. And so this is what I ordered. It was prepared for me in a short period of time and came to me in a little basket.
It was a little basket of pure orgasmic heavenly blissful sinful amazingness.
It was a freaking religious experience. I mean, check it:

Look at that oozy goodness! I mean LOOK AT IT. It's beyond words...It defies description! It was unspeakably unspeakable!

I almost wanted to order another right away, but I had to resist knowing that we were going to have dinner out in the not too distant future.
Holy crap, if you live in Van or are thinking of going there, I highly recommend you check this joint out! Jodi and I are definitely going there during our get-together in October!
Blueberry Crumble with Coconut Pecan Topping
Out with the old and in with the new! That's what I'm trying to do with my fridge freezer these days. I plan on making some more big batch stuff shortly, and it's also about to become summer fruit season, so I decided to stop hoarding frozen fruits and start using them so I can fill the freezer with fresher stuff. I had 7 cups of blueberries from last summer bagged up, and I took 6 of them out to make a crumble yesterday.
I never use a recipe when making a crumble. I eyeball everything and add what I feel would work. So that's why, apart from the 6 cups of blueberries, there aren't any measurements. Actually, I did measure the butter because, with the price of that particular ingredient, I am hoarding it a bit.
 Blueberry Crumble with Coconut Pecan Topping
6 cups of blueberries
juice of 1 lemon
some white sugar (not too much; the blueberries were sweet enough themselves)
cornstarch, so it coats the blueberries lightly
for the topping:
oatmeal
coconut
brown sugar
two handfuls chopped pecans
cinnamon
2/3 cups butter
You'll need a 9x13 pan for this, and I'd bake it on a baking sheet in case the filling boils over. Bake at 375F until the fruit is all bubbly and the top is nicely golden brown.
It was pretty delicious, I must say! All it needed was some ice cream, which I didn't have on hand.
Now, I have a whole whack of pumpkin to use up!
I never use a recipe when making a crumble. I eyeball everything and add what I feel would work. So that's why, apart from the 6 cups of blueberries, there aren't any measurements. Actually, I did measure the butter because, with the price of that particular ingredient, I am hoarding it a bit.
 Blueberry Crumble with Coconut Pecan Topping
6 cups of blueberries
juice of 1 lemon
some white sugar (not too much; the blueberries were sweet enough themselves)
cornstarch, so it coats the blueberries lightly
for the topping:
oatmeal
coconut
brown sugar
two handfuls chopped pecans
cinnamon
2/3 cups butter
You'll need a 9x13 pan for this, and I'd bake it on a baking sheet in case the filling boils over. Bake at 375F until the fruit is all bubbly and the top is nicely golden brown.
It was pretty delicious, I must say! All it needed was some ice cream, which I didn't have on hand.
Now, I have a whole whack of pumpkin to use up!
Lemon Trifle
Happy Easter to all my readers who celebrate it!
We had our Easter dinner last night due to scheduling issues, and after my lemon pound cake disaster last Tuesday, I offered to bring a dessert so I could get rid of that ugly beast pronto to make room in my freezer for more successful endeavours. Lemon-flavoured desserts in the spring are just the best, I think. Well, they're the best at any time of year, but it seemed particularly appropriate yesterday because it was a beautiful sunny day for once and lemons remind me of sunny things. This is a super simple trifle that was an enormous hit.
 So:
So:
- one lemon pound cake, cut into cubes
- 1 jar lemon curd (I used Robertson's because it was the least expensive at LOGS)
- 500mL whipping cream, whipped to a decent firmness, just not butter
- 1 large package (the one that makes 6 servings) vanilla pudding, prepared
Layer in the cake with the lemon curd dabbed over the top of the cake cubes, then pour over the pudding, then some whipping cream, and repeat till everything is used up, topping the trifle with whipping cream. I topped mine with some almond flower decorations.
It took about 15 minutes to make and was absolutely heavenly and delicious!
Have a great day everyone, and for those of you who are Canucks, enjoy the long weekend!
We had our Easter dinner last night due to scheduling issues, and after my lemon pound cake disaster last Tuesday, I offered to bring a dessert so I could get rid of that ugly beast pronto to make room in my freezer for more successful endeavours. Lemon-flavoured desserts in the spring are just the best, I think. Well, they're the best at any time of year, but it seemed particularly appropriate yesterday because it was a beautiful sunny day for once and lemons remind me of sunny things. This is a super simple trifle that was an enormous hit.
 So:
So:- one lemon pound cake, cut into cubes
- 1 jar lemon curd (I used Robertson's because it was the least expensive at LOGS)
- 500mL whipping cream, whipped to a decent firmness, just not butter
- 1 large package (the one that makes 6 servings) vanilla pudding, prepared
Layer in the cake with the lemon curd dabbed over the top of the cake cubes, then pour over the pudding, then some whipping cream, and repeat till everything is used up, topping the trifle with whipping cream. I topped mine with some almond flower decorations.
It took about 15 minutes to make and was absolutely heavenly and delicious!
Have a great day everyone, and for those of you who are Canucks, enjoy the long weekend!
Cadbury Mini Egg Ice Cream
 In a fit of premenstrual pique last weekend, I purchased a 1kg bag of Cadbury mini eggs. It felt so evil, but they are so good! I just finished the bag off now, and let me tell you, it took considerable will power on my part to not inhale the whole bag within a day of purchase.
I didn't eat them all in their natural state, however. I had a brain wave during my PMS craziness: ice cream! Why not? I am out of store-bought ice cream and it's so frakking expensive here for the good stuff and the stuff I like that I'm not going to buy it. But it's cheap as hell to make, so make it I did! And the results were excellent!
Cadbury Mini Egg Ice Cream
2 cups whipping cream (35%)
1 cup whole milk (3%)
3/4 cup sugar
3 vanilla beans (I have a package I'm trying to use up because they're getting dry, so that's why I used this many)
1 cup chopped Cadbury mini eggs
This is my typical ice cream recipe (minus the mini eggs, of course). I just combine the cream, milk, sugar, and vanilla, really well in a large measuring cup, and pour it into my ice cream maker. Close to when the ice cream is ready to come out of the machine, I added the chopped mini eggs. Freeze till firm. And Bob's your uncle!
The shells turned the final product a bit of an odd colour, but that's OK. It tastes great!

I may need to buy another bag...
"Say Yes to Noh!"
 Best motto ever!
It comes from this company, Noh, which makes a whole bunch of Hawaiian mixes, one of which, the Haupia Pudding/Luau Dessert AKA Coconut Pudding, arrived in a nice box from that fair State, along with the macadamia nuts I've been making cookies with, courtesy my friend Jodi. Tonight, needing a sugar fix very badly, I made the pudding mix. It was dead easy, being one of those "just add water" jobbies.
The picture on the package doesn't look much like a pudding, however; the little squares of whiteness look like something much thicker than a pudding, but in the fine print on the package, the word "flan" is used.
 That's more like it. The pudding, once cooled in the fridge, set up in a very solid, flan-like way. You could cut it into any shape you wanted to.
The verdict: weird! Very weird! Solid, and not creamy the way a flan normally is. I guess that's not surprising given it only required me to add water to it. But it was also quite flavourless, which was disappointing; it tasted bland and watery. I added some chocolate chips to mine just to make it more interesting, but I still couldn't finish it in the end.
 Oh well! It was still a bit of a tropical, cultural experience in my Canadian winter surroundings, so that alone was worth it.
Incidentally, the package also says this makes a great topping for cakes, but I wouldn't go there. I also don't think it would be good warm on ice cream, as the package also suggests. Go with Jello pudding instead!
Subscribe to:
Posts (Atom)
