Showing posts with label bread making. Show all posts

Latest Bagels

Last weekend I made another batch of bagels and I have to say this was the best batch yet.  Previously, I amended the recipe to make 12 bagels instead of 10.  I said in that post that the next time I make bagels, I'll weigh the dough out and divide it by 12, and that's what I did.

The dough weighed 1.29kg and for 12 bagels, it came out to 108g per bagel.  Doing it this way made a huge difference.  The bagels were way more uniform in size, which made them much easier to shape.  And instead of shaping by poking a hole and then rubbing the hole between my palms, I focused more on stretching the dough instead.  As you can see, I got smaller holes in the middle, but I'm not overly concerned about that.  They're easier to make sandwiches out of if they don't have a huge hole in the middle.  The last change I made to this recipe was to skip the pepper altogether, and I have found that I prefer the pepper-less ones.

This has definitely been a learning process and finally I am getting these puppies to the place I want them to be!


Pizza Dough/Foccacia/Bread Dough

Instead of ordering pizza while in Seattle, Jodi made a homemade pizza dough and we made individual pizzas for dinner one night.  There was a hunk of leftover dough, so we did something else with it another night.  But first, let me share the dough recipe because it's quite honestly one of the best homemade ones I've had.  The original recipe came from Jodi's copy of The Food of Southern Italy by Carlo Middione.

Basic Bread Dough For Making Homemade Italian-Style Bread, Pizza, and Focaccia (page 47 of The Food of Southern Italy)

2/3 cup warm water, not over 100F
1 1/2 tsp yeast, fresh or dry
3/4 tsp salt
2 cups bread flour
3 tbsp olive oil (added to the warm water)

The book has about three pages of directions, which I'm not going to go through.  Check out my bread baking tutorial instead!  The original recipe does say that this can be easily doubled or tripled.

For extra special flavour and a great aroma, Jodi adds garlic powder to the recipe.  This comes out light and airy and crisp, with big air bubbles reminiscent of ciabatta bread. 

Here are the pizzas we made!

Jodi's pizza

My pizza

As I mentioned, the third portion of dough was saved and refrigerated for another use.  So the next night, Jodi made an amazing garlic cheese bread with it.  OMG!  So good!


I'll be keeping this dough recipe handy for future pizza nights in my own house!

Bagels Redux

I was nearing the end of my last batch of bagels, so this weekend I decided to make some more. I am determined to become a bagel-making queen! Again I used Rose Levy Beranbaum's recipe from The Bread Bible, but I did a few things differently this time.

  • I made 12 bagels from the recipe instead of 10. This worked very well and I was very happy with the size this batch came out as
  • I reduced the black pepper to 1/2 tsp instead of a full tsp. The last batch was too peppery. I might forgo the pepper altogether next time
  • I used a whole egg for egg wash instead of just the whites. Not a big change, but it worked just as well
  • most notably, I boiled the bagels for a longer time than I did previously. This, I think, was key in making them nice and chewy
  • I baked them at a higher temperature for a shorter period of time
  • I did half with sesame seed topping and half with coarse salt
I still need a lot of practice portioning and shaping the bagels. One of the reasons I decided to go with 12 bagels over 10 is that it was easier for me to eyeball the portions, but even with this change I had different-sized bagels. What I might do next time is weigh the dough out before portioning and divide the weight by 12 so I'll get the most consistent size. Shaping is still an issue, though it was better this time than it was before. Rolling ropes of dough, or making holes in dough like this, is not one of my fortés.


So, things are coming along. These should last me over 2 weeks, so I'll make more then.

Bagels

Last summer I was really into making my own bagels, and my product was getting better and better each time I made them. I was really learning from my mistakes. I stopped when I went back east on holidays and then moved to the coast at the end of September. Lately, I have been fancying a good bagel and I don't want to buy crappy grocery store ones because they really are a waste of money. So, last night I got down to it and started a batch.

I usually use Rose Levy Beranbaum's bagel recipe from her Bread Bible cookbook. So far, it's the best recipe I've come across, and I previously posted it here.

One of the main things I need practice on is shaping these darned things. I make a ball using the "fassionage" method I learned in culinary school, then poke a hole in the middle and start rolling and stretching the hole wider. But I always get a lopsided-looking bagel. A big lesson I learned was putting the shaped bagels on a well-floured tea towel to rise, turning them over once so both sides are floured, then putting a second tea towel over the top for the rising. I learned this after not being able to pick up the bagels to boil them without deflating them because they were sticking to whatever I was using before. With this tea towel method I have no more deflated bagels going in for a dip.

The one thing that always ticks me off is that once my bagels are in the boiling water, they go all wrinkly. And they come out wrinkly. I don't know why this is but I have found that some of the wrinkles bake out.

Here is what they look like when they come out of the boiling water:


And here is what they look like when they've been baked:


Not bad. The batch I made today tasted the best of any I've made: chewy on the outside, but nice and soft on the inside. I boiled these longer than I normally to, and I think that was important. I also used molasses today instead of barley malt syrup because I haven't been able to find any of that particular ingredient yet. The molasses worked very well, though, and I added about a tablespoon or so to the water for the boil. I put the black pepper in, as it is in the original recipe, and this definitely gave them a kick.

I'll try another batch soon!

Rustic Apricot Orange Rose

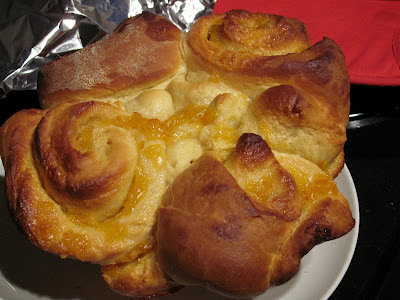
Jodi baked another fabulous treat last week during my stay: a Rustic Apricot Orange Rose, made from the Poor Man's Brioche recipe from The Bread Baker's Apprentice, page 128. The filling was made with Apricot Orange Marmalade Freezerves, made by Sunfresh.

Jodi has a cool clear glass brioche pan. Excellent! I must find one of these!


And the results:


The brioche was fabulous: so flaky, moist, and almost cakey. Very tender, very buttery. And the filling was really good, too. Jodi says that you can get it from Amazon Fresh if you live in Seattle, or at Whole Foods in the freezer section. I was really impressed with the freshness and brightness of the flavours in it.

Lots of food to come in future posts!

Lemon Scented Pull-apart Coffee Cake

Hot on the heels of my pumpkin/cinnamon pull-apart loaf from the other day, I had another pull-apart bread experience, this week in Seattle, that was just as exceptional. My friend Jodi, whom I am visiting, made this lemon pull-apart loaf Thursday. She had some issues with the dough - it needed a lot of flour added to it because it was too sticky - but the results were just great nonetheless.


Jodi made a marscapone glaze for this loaf instead of the glaze in the rec

ipe. It was very good. She didn't think it was that great, or that it went with the bread that well, but I certainly enjoyed it.

Here are some photos. Enjoy!


Pull-apart Cinnamon Sugar Pumpkin Bread with Rum Butter Glaze

Oh, Pinterest, how do I love thee? Sometimes, way too much. But as I've said before, the food on it is unbelievable, and when I saw the recipe for this treat I knew I had to make it, and last week, I did. I even went and purchased a mini of rum for the glaze!

The original blog post & recipe is here.

So, let's get down to business. After making the dough (I used instant yeast so I didn't have to go through the extra step of activating it) and letting it rise, I went about shaping it. The instructions say to roll the dough out into a 20x12" rectangle, spread with the cinnamon sugar mixture, and cut that into six strips. Then you take those strips and lay them on top of each other, and then cut them into six squares. After that, you stack the squares on their edges in a loaf pan. I greased my loaf pan pretty well.


Then the loaf goes for another rise. This is where I had some issues. The squares were quite tightly packed in the pan, but as the loaf rose, the end ones rose up and out of the pan.


Upon baking, I got quite an odd-looking and lopsided loaf:


The other issue I had was that the bottom of the loaf caramelized to the loaf pan and I couldn't get the loaf out of the pan until it was rather cool and I could get my hands in and kind of tear it out by the roots. I just removed it straight to a platter for serving.


So, it wasn't over attractive. But so what? This was absolutely delicious! The rum & butter glaze was absolutely to die for, and that little recipe is going up my sleeve for some other ideas I have for it, like as a cinnamon roll glaze, for instance.

The only criticism I had was that the pumpkin flavour was quite lost with all the other flavours going on in here. It added a nice colour to the dough, though. But if I do this again, I might use more pumpkin or alter the recipe so that it's more of a brioche dough and just do a more plain pull apart loaf. But look at it! It's gorgeous!


My roommates and I tore into it and dipped the pieces in more glaze until we nearly devoured it. We left just enough for a small snack the next day.

Here it is again, from another angle:


Definitely a keeper of an idea. Go Pinterest! My roommate and I are working on another Pinterest recipe now, but it takes a while so I won't get a post up about it quite yet, but it should be worth the wait, especially if you love Reese's Peanut Butter Cups and vodka. :D

Magazine Monday #80 and 101 Uses for a Roasted Chicken #27

I'm on a bit of a pizza kick lately, and as mentioned in the previous post, I'm trying to use up things in my freezer. I still have a bunch of that roasted chicken from a catering gig last month frozen, and so I decided to make pizza with it - again! - and use a new pizza dough recipe I came across in Food Network Magazine, a publication I really look forward to receiving each month.

Yesterday, in addition to making blueberry crumble, I made a chicken, red onion, kalamata olive, and mushroom pizza. It was delish!

The pizza dough recipe is here, and it came from the March 2011 issue of the magazine. I really liked this recipe. It made enough that I could divide it in three portions and put the other two in the freezer, and it was quite a light crust that bubbled up attractively when baked.

It's been a great weekend of food around here, that's for sure!

Magazine Monday #79 (on a Saturday): Guy Fieri's Soft Pretzels

Strange cravings are upon me these days, and while going through a pile of magazines taking up space on my coffee table, this soft pretzel recipe by Diners, Drive-ins, and Dives host Guy Fieri caught my eye. I have recently become a Triple D (or, as I like to call it, D3) fanatic. I don't know why it took me so long! Where has this show been all my life! It took a while for Guy to grow on me, but grow on me he has, and now I am addicted. This is probably another reason I wanted to make this recipe.

Unfortunately, I didn't think too much of Guy's soft pretzel recipe, which came in the January/February issue of Food Network Magazine. The recipe is here.

Lately, I have been practicing making bagels, which are boiled. I have posted before (here and here) about some pretzels I've made that are also boiled. I have to say, I much prefer that recipe and the boiling method over this non-boiled pretzel by Guy. Guy's are tasty for sure, and I enjoyed the stuffed ones (I used homemade pesto and mozzarella cheese to stuff mine), but they are, essentially, a pretzel-shaped bun without that nice chewy texture.

So, I'd give this a miss. Sorry, Guy! I love you, but this wasn't my cup of tea!

50% Whole Wheat & Flax Bread

Another day, another loaf of bread. But before I get to that recipe, I got a shot of C's borscht and what it looks like when she makes & cans it. As you might recall from my previous post, I deviated from her recipe's instructions and got a different-looking soup. Here is what hers looks like, in a 1L jar. Isn't it pretty?


Now, onto the bread.

I adapted this recipe from my Le Cordon Bleu Complete Cook book, where I also go the milk bread recipe from. I don't like 100% whole wheat bread; I don't like the texture and my stomach has a hard time with that much fibre. So I cut the whole wheat flour in half and also added about 1/4 flax seeds, which I had hanging around my freezer.

50% Whole Wheat & Flax Bread (adapted from Le Cordon Bleu Complete Cook, page 463)

1 tbsp instant yeast
1 tsp sugar
1 tsp salt
2 cups whole wheat flour
2 cups white bread flour
2 tbsp butter, softened
2 tsp barley malt syrup (or honey)

Directions here. And this is what she looked like:

The original recipe called for 2 tsp barley malt; I have no idea what is meant by that - whether they're talking about a powder or a syrup or what. I've had a jar of barley malt syrup kicking around since I made bagels a couple years back, so I use it whenever I get a chance. It adds great colour & flavour to bread.

Milk Bread

Milk bread (pain au lait) is one of those standard French breads that was heavily drilled into us while in culinary school. There are a zillion recipes for it (here is the culinary school recipe I've made several times). In need of a good basic loaf this week, I went for a different milk bread recipe, this time from my Le Cordon Bleu Complete Cook book, which is just excellent. The recipe is for buns (petits pains au lait) but I just shaped the dough into a loaf and...forgot that it was proofing...Yeah, not my prettiest loaf by far, but still edible and it makes great toast. The texture was a bit crumbly, so I prefer the other milk bread recipe, but this one did the trick, and now I know that I need to put the timer on when I'm proofing something in addition to putting it on when I bake something! We live and learn.

Milk Bread/Pain au Lait (adapted by me from the recipe on page 462 of Le Cordon Bleu Complete Cook)

1 tbsp instant yeast
1 tbsp sugar
4 cups bread flour
1 tsp salt
1 1/2 - 2 cups milk
2 tbsp melted butter

Directions here.

And here is my loaf...

Magazine Monday (on a Friday) #73: Molasses Oat Bread

I'm trying hard to get back into making my own breads, just to keep my grocery bills low and to help me feel productive. For the last few weeks, I've managed to do this, and I'm also making two at a time so I can freeze one for later, too.

I came across this recipe for Molasses Oat Bread in the November 2010 issue of Canadian Living Magazine, in a segment on bread machine breads. I didn't use a bread machine, of course, just my regular method.

I'm not the biggest molasses fan in the world, but I fancied it for some reason. And it turned out quite well in the end. I didn't have any whole wheat flour on hand, so I just used white. It's sweet but not overly so, and will be just fine with a nice bit of ham & Swiss cheese!

Lingonberry Bread...From Ikea

A couple of months ago, my dad went to Vancouver and spent a whole day in Coquitlam's gigantic - and I mean GIGANTIC - Ikea store. He was very impressed with the cafeteria there, and he also really enjoyed the food selection for sale that you could bring home & prepare yourself. He bought three copies of the Ikea cookbook - one for me, him, and my SIL, and he also brought me back a package of Lingonberry bread mix. He was attracted to this item because the ingredients were right up his alley: no white flour whatsoever, full of seeds, and nice and wholesome-looking.

I finally got around to making this bread on the weekend for a family dinner. Basically, it was a just add water deal, with the yeast in a separate package attached to the bag of mix. All I did was chuck everything in my mixer, develop the dough, let it rise, shape, rise, and bake.

Incidentally, this bread mix is Danish, not Swedish!

Anyway, this is what I got:


I was a very tasty, crusty loaf, actually, but I thought the mix was pretty chintzy on the lingonberry angle; there were barely any berries in it and they didn't add anything to the flavour at all, which was disappointing. But it was a nice loaf and Dad was pretty happy. The mix made two loaves, so he got one and so did I.

I have yet to use any recipes from the Ikea cookbook...

Golden Cheddar Loaf

I am making a concerted effort to get back into the habit of making my own bread. I was getting lazy, but now that I've moved and am kind of starting a new phase of life, I think I need to get back to bread baking. The other day, I made this really nice, soft loaf, and the recipe comes from the Fleischmann's Yeast "Best Ever Breads" booklet.

Golden Cheddar Loaf

3 to 3.5 cups flour
2 tbsp sugar
1 package or 2 1/4 tsp instant yeast
3/4 tsp salt
1 cup water
1/3 cup milk
1 1/2 cups grated sharp cheddar cheese
egg for an egg wash

Instructions here.

I added poppy seeds to the top of mine, just for the hell of it.

Turned out lovely!

Milk & Honey Bread

This is the second recipe I've made from the most excellent book, Earth to Table.

Now, I made the recipe as printed in the book, but I realized right away that there was a flaw in it. 6 cups of water to 1 1/2 cups of liquid will simply not work. I got one loaf of bread, and although it was delicious, I needed to resolve this issue! I contacted the Random House rep I work with for the reviews and she suggested Tweeting the authors, who manage their own Twitter page. I did this and got a reply!

This is a beautiful, tasty loaf, and I'll definitely make it again.

Milk & Honey Bread, by Jeff Crump & Bettina Schormann of Earth to Table fame, recipe available on Twitter

mix together:

2 cups of flour
3 tsp salt
1 tsp instant yeast

Add:

1 1/2 cups milk
1 1/4 cups water
1/4 cup honey

- Mix until all goopy

Add: up to 4 cups of flour, until you get a nice dough

Follow these basic instructions.

And voila!Beautiful! Wonderful! Amazing! I loved the soft texture of this loaf, and the sweetness the honey gave to it!

Magazine Monday #51: Onion Bialys

Note to self: always read - and follow - recipe directions.

Aahhhhh...lots of cool recipes in this month's Canadian Living, and one of them was for these Jewish buns called Onion Bialys. They really appealed to me, and I had everything on hand, so off I went. Basically, these are small buns with an onion & poppyseed filling.

I did read the entire recipe first, I just forgot a pretty significant step: the pressing of the shaped buns into 3" discs. Because shaping these as they were supposed to be shaped would have kept the onion & poppy seed filling in the bun rather than it exploding everywhere during the first few minutes of baking, when the yeast gets one last push before dying off.

The onion got a little toasty as a result, but other than that, they were a nice bun, and I'd make these again. Next time, I'll follow the directions, though!

Some Simple Bread, Award, MM Shout Out

Well, it's cooled off - thank God! I can now get back to some regular bread baking.

This week, I needed something quick & simple so I chose a recipe I use every so often from my Le Cordon Bleu: Complete Cook cookbook. I love this book; it's my go-to book for basic French stuff & simple, traditional baking.

You can find the recipe in this post. I subsituted 1 cup of whole wheat flour for 1 cup of the bread flour, but otherwise everything is the same. I decided to treat myself to a braided loaf.
Which I topped with an egg wash & sesame seeds...
And here is the finished product:
I realized while making this how much I miss making my own bread, and how satisfying this is for me. So, bring on the fall!


And now, another award! This time from Girlichef who has an awesome blog that contantly makes me want to drool! She gave me this "Tasty Blogger" award, for which I am most grateful! I try to be as tasty as possible, trust me. Thank you, Girlichef!

Finally, just a reminder that I am still hosting Magazine Mondays, and if you have a magazine recipe you've recently made and posted, send me an email at wandering_coyoteATyahooDOTca, and I'll post your link in my MM post on Monday.

Magazine Monday #42: Herbed Focaccia

I've had this recipe from the May 1994 issue of Canadian Living Magazine for quite some time, and I've made it several times, particularly when I worked at a retreat centre and we needed a quick pizza crust. I didn't do the sponge step back then, but I did it today and it was well worth it!

Herbed Focaccia (adapted by me)

1 cup warm water
1 tsp sugar
2 1/4 tsp instant yeast
2 1/4 - 2 1/2 cups bread flour (all purpose will work)
2 tbsp olive oil
1 tsp salt
1 tsp dried herbs of your choice (I used thyme & oregano)

1. Make the sponge. To do so, combine 1 cup flour, the sugar, and the water in a bowl until smooth. Cover with plastic wrap & let sit at warm room temperature for at least an hour.2. Once the sponge has done its thing, add the salt (I forgot to do this, and man, could I ever tell the difference!), herbs, olive oil, and enough additional flour to make a nice dough.

3. Proceed as per these instructions.

In the end, I got enough dough to fill a 9x9" pan. I docked the dough with my fancy docker and set it to rise under a towel.Docking the dough allows for it to rise and bake evenly, with fewer big giant air bubbles making the surface all weird.

After baking, I had this:Nice, eh?

The loaf was feather light and had very little weight to it. And it was bland, despite the herbs, because I'd forgotten the salt.

And you'll just have to wait and see what amazing sandwich I made with this focaccia for dinner - but I can tell you it was outstanding!
Related Posts Plugin for WordPress, Blogger...